Friday, December 11, 2009

Setting up and using KDiff in Visual Studio

One of the things that really sucks when using TFS is the integrated Diff and Merge tool which it ships with. I’ve tried out a few merge tools, and the one I was using previously was pretty good (I didn’t think a merge tool could get any better), and if you decide you don’t like KDiff then I would recommend giving it a try.

http://www.sourcegear.com/diffmerge/

Anyhow, a work mate recommended KDiff, initially I didn’t like the look of it. The user interface isn’t very inviting, if anything its rather intimidating. However once you get past its initial complexity its actually very simple and easy to use. Not to mention its quite powerful, and its three way merge algorithm is even more clever than TFS (its not hard tbh).

First download and install KDiff: http://kdiff3.sourceforge.net/

Next let’s set up visual studio to use it instead of the built in one, for both diffing and merging.

Go to tools and options.

image

Then select Source Control in the left pane, followed by the Visual Studio Foundation Server child item.

image

Hit the configure User Tools button.

image

Hit the Add button, and setup your comparison tool with the following data:

Extension: .*
Operation: Compare
Command: <location>\kdiff3.exe
Arguments: %1 --fname %6 %2 --fname %7

Next setup your merging tool with the following data:

Extension: .*
Operation: Merge
Command: <location>\kdiff3.exe
Arguments: %3 --fname %8 %2 --fname %7 %1 --fname %6 -o %4

Nice, you’ve setup KDiff as your default tool! The next post will outline some useful shortcuts and features.

Wednesday, December 9, 2009

Finding the root of all evil

Recently I was trying to fix a bug on a project I’m currently on, however in trying to fix it I found another 2-3 issues which I deemed more critical so I was slightly side tracked.

After fixing the other problems I returned to the bug I initially wanted to fix, only to find its already been fixed, great! Well it should have been.

The bug in question is when clicking a button on one of our wpf screens. A NullReferenceException was being thrown when attempting to load a dialog. The mischievous piece of code was this:

var startData = new ProductCodesDialog.StartData(hierarchicalCodeType)
{
DefaultSearch = productCodes.Trim().FinderSplit()
};

The problem? productCodes which is a string was null. This is fine and there’s probably nothing wrong with binding to null string values. But this piece of code was relying on the string being empty instead.

So the fix that I found nicely patched into place was the following:

if(string.IsNullOrEmpty(productCodes))
{
productCodes = string.Empty;
}

If something’s Null and we don’t want it to be null, then we just initialise it right? There was another piece of code in the actual textbox control which had something to say about that...

/*
* This fix below is for a strange issue whereby deleting all
* text in the textbox is not updating the source.
*/
if(Text != null && Text.Trim().Length == 0)
Text = null;

So this value is being constantly set to different values because dependant code is scared of throwing exceptions. Let’s take a look at what the value is initialised to so we have a starting point.

private String _value = String.Empty;

So whoever created the base type StringWithMatchType designed it with String.Empty being the starting value, IMO we should probably respect that as a heap of functionality has been built on top of this.

So why is it being set to null in the control? Apparently the bound object is not getting updated when someone selects all the text and deletes it. So let’s see if it’s the case... *a few minutes happened here* and to cut a long story short it does appear to be the case. So the new question becomes:

Why doesn’t my binding update to string.Empty when the textbox text is deleted? After a bit of Googling I found this:

http://jeffhandley.com/archive/2008/07/09/binding-to-nullable-values-in-xaml.aspx

So WPF is being carful not to null a bound property, not the ideal behaviour in this case. Ideally we want a string.Empty but perhaps WPF can’t be sure of what to do. Never-the-less luckily we are using .NET 3.5 SP1, and with that comes a handy binding property by the name of TargetNullValue

http://msdn.microsoft.com/en-us/library/system.windows.data.bindingbase.targetnullvalue.aspx

So while this issue doesn’t affect the code above, as it’s binding to a string and does correctly propagate a string.Empty, it does affect some other places we are using the same custom textbox control. Wherever we are binding to Nullable<T> values seems to be affected, whether WPF doesn’t update the bound object when the textbox is emptied. I can only assume it was for this case the Text property on the custom control was being nulled. Using the TargetNullValue we are able to get around this:

WPFControls:TextBoxWatermark Text="{Binding Path=Value,TargetNullValue={x:Static System:String.Empty},UpdateSourceTrigger=PropertyChanged}"

And when retesting this the Nullable property is correctly being set to null when the textbox is emptied.

A dash of curiosity coupled with an inquisitive nature and a distaste for quick hacks seems to have got this problem resolved in quite a satisfactory manner!

Tuesday, December 8, 2009

Regex.IsMatch always returning true?

The following code was failing:

[TestMethod]
public void ShouldNotMatchInvalidCharacters()
{
Regex regex = null;
string invalidString = null;
bool result = false;

Story.WithScenario("matching invalid characters")
.Given("a regex expression",
() => regex = new Regex(@"[0-9]*\.{0,1}[0-9]*"))
.And("an invalid string",
()=> invalidString = "a")
.When("we check whether we have a match",
() => result = regex.IsMatch(invalidString))
.Then("the match should fail",
() => Assert.IsFalse(result));
}

It turns out it was matching on the empty string. I couldn’t think why on earth it was doing this. A bit of googling and the correct way to match on an entire string is to specify the start and end of the string in the regex.

^[0-9]*\.{0,1}[0-9]*$

The test now goes green!

Monday, December 7, 2009

PDC Downloader FileNotFoundException – Update 6

Big thanks to Sam for diagnosing and suggesting how to fix this one. It turns out System.Threading (Parallel Tasks Library) was not being copied in as a referenced assembly, I thought it was.

Anyhow – in the usual fashion, there's a new version:

download

Friday, December 4, 2009

Getting things right the first time round

After releasing the PDC downloader application I have learned quite a few things the hard way. Releasing any software, be it open source, free or with a limited target audience comes with the same strings attached as any software.

For this tool I wanted the code base to be nice, feature set to be just enough, to be well tested and to learn a few things on the way. In this way it turned out to be a great success, but in trying to keep things lightweight and push versions out early I made some critical errors.

  1. Do not underestimate the usefulness of automatic updates. No matter how small the application, you always want to keep your user base up to date. Even if the updates are tiny and incremental, reaching everyone that has already downloaded a previous version is vital. There will come a time when something show stopping happens, and its a pain for your users to have to manually get an up to date version. In this respect, I really wish I employed the use of something like ClickOnce from the start!
  2. When I hacked the UI together, I wanted it to be functional so I didn’t mind having a basic UI. But to be honest the UI was too basic, which actually made it less functional than I intended. A few hours in blend would have easily rectified this which is another thing I wish I did from the start.
  3. And finally error reporting. It’s fine to set up a log file so all exceptions are logged somewhere. But this isn’t much use to users who just want to download something and have it work. Something simple like making it easier for users to email an exception is something which should have been there from the very beginning.

I really hope I won’t make these mistakes in the future.

Putting it together series – Part 2: IoC Container (Castle.Windsor and Fluent Castle)

Introduction

Whenever I need to put even a simple application together there’s always a whole bunch of infrastructure I need to put in place. For a WPF application this can include:

  • IoC Container
  • Testing Framework
  • MVP / MVVM Framework
  • Logging
  • ORM

This was recently the case when putting together the PDC downloader.  So I’m going to put a quick post around each of these areas. Besides the UI Framework everything else should convert over to ASP.NET without too much difficulty.

There is going no be no real example as I don’t want to complicate the solutions. Each solution will contain the minimum code to get the relevant area up and running, with the smallest example I can give. Once you have things going, Google will provide more advanced help.

Part 2: IoC Container

So we have our testing framework in place, the next step is to put in our IoC Container so we can dependency inject domain services in our business objects, or UI services into our UI objects. If you want to know more about what IoC and DI is there is a host of information explaining the technology and how to use it. This guide will be around setting up one of my preferred containers and integrating it with the tests we already have.

The container in question is Castle.Windsor which IMO is one of the more powerful and configurable containers available. It has good performance and is easily extensible offering some powerful extension points. It is also one of the more popular containers offering great documentation (both on the official site and by 3rd party bloggers), as well as lots of adaptors to plug it into various other frameworks.

So let’s get started, we really want to use the latest code and the easiest place to get it is here:

http://hornget.net/

Clicking on IoC gives us access to the latest build of the Castle.Windsor trunk, exactly what we need! We’ll need to set up the following referenced assemblies in our solution:

image

Now we already have an entity from the last example called SillyPoco, and a service which its dependent on called ISillyService. So what we want to do is create a concrete SillyServiceImpl and inject that into our SillyPoco object.

We’ll start with a test:

[TestMethod]
public void ShouldInjectSillyServiceIntoMyObject()
{
SillyPoco sillyPOCO = null;
bool result = false;

Story.WithScenario("a plain old nbehave spec")
.Given("an object we are going to test",
() => sillyPOCO = FrameworkHelper.New<SillyPoco>())
.When("we call a method on the object",
() => result = sillyPOCO.TalkToService())
.Then("the service should have been called",
() => Assert.IsTrue(result));
}

So we’ve made the service contract return a boolean, and we are checking that it should return true. We’ve also got a static helped method called FrameworkHelper.New<T> which will create our object that needs to have dependencies injected. Here’s how it looks:

public static T New<T>()
{
return Container.Resolve<T>();
}

That looks good, this is how we will ask the container for instances of our dependency injected objects. This is a simple implementation of the ServiceLocator, for something more advanced I would recommend: CommonServiceLocator which Castle.Windsor is compatible with.

So we have a method to get our objects, let’s setup the container. Since we are in a test project we should probably refactor the setup into a test base class to be shared throughout the tests.

protected override void Establish_context()
{
base.Establish_context();

WindsorContainer windsorContainer = new WindsorContainer();
windsorContainer.Register(
Component.For<ISillyService>().ImplementedBy<SillyService>(),
Component.For<SillyPoco>().ImplementedBy<SillyPoco>());

FrameworkHelper.Initialize(windsorContainer);
}

We've now set up our container. Essentially what we’ve told it is:

  • If anyone asks you for a ISillyService, return a new instance of SillyService
  • If anyone asks you for a SillyPoco, return a new SillyPoco and insert a new instance of ISillyService into it.

So now when we run our test it goes green! Now we have our container set up, it will start getting much easier to put our application together!

You can find the code for the examples at the bitbucket repo:

http://bitbucket.org/naeem.khedarun/projectpit/overview/

The samples for this part are under a tag called parttwo. Simply get the repository and update to that tag.

Wednesday, December 2, 2009

PDC Downloader – Major Bug Fix

Unfortunately the PDC Sessions file the application was using had some corrupted session codes, which meant these sessions could not actually be downloaded. A work mate of mine (Robin Prosch) luckily brought it to my attention (Thanks!).

image

In order to side step this, the application goes to http://micrsoftpdc.com/videos to get the available sessions and the downloads should now work correctly. I highly recommend getting this update if you want to download any of the affected sessions (there are quite a few!).

The application start up time has taken a couple of seconds hit but its well worth it for getting an up to date list of sessions (and correct!), although I don’t think its likely to change at this point.

Sincere apologies for this one, I wish I’d spotted it sooner!

download

Monday, November 30, 2009

Putting it together series – Part 1: Testing Framework (NBehave, Rhino.Mocks)

Introduction

Whenever I need to put even a simple application together there’s always a whole bunch of infrastructure I need to put in place. For a WPF application this can include:

  • IoC Container
  • Testing Framework
  • MVP / MVVM Framework
  • Logging
  • ORM

This was recently the case when putting together the PDC downloader.  So I’m going to put a quick post around each of these areas. Besides the UI Framework everything else should convert over to ASP.NET without too much difficulty.

There is going no be no real example as I don’t want to complicate the solutions. Each solution will contain the minimum code to get the relevant area up and running, with the smallest example I can give. Once you have things going, Google will provide more advanced help.

Part 1: Testing Framework

The first think I end up needing in any solution is a testing framework, and currently my framework of choice is NBehave, a superb framework for writing any tests be it TDD or BDD.

http://nbehave.org/

In my case I’m using MSTest; I prefer Gallio/MBUnit but they current don’t work so well in VS2010. In any case, after creating a new C# project your referenced assemblies should look something like this:

image

So we are ready to put together our first spec! The example will contain a little bit of rhino mocks to show the integration NBehave has put around it.

So let’s write our first BDD Story.

protected override void Establish_context()
{
this.Story = new Story("writing our first nbehave spec");
this.Story
.AsA("person new to nbehave")
.IWant("a simple example")
.SoThat("I can better understand how to use it");
}

This story doesn’t actually do anything, however if we ran the NBehave tool we would have that output together with the scenarios. This way when a test fails, you know exactly which business functionality has been affected.

[TestMethod]
public void APlainOldNBehaveSpec()
{
SillyPOCO sillyPOCO = null;
string junglegon = "Junglegon";

Story.WithScenario("a plain old nbehave spec")
.Given("an object we are going to test",
()=> sillyPOCO = new SillyPOCO())
.When("we set a property on that object",
()=> sillyPOCO.Name = junglegon)
.Then("we should have changed that object",
()=> Assert.AreEqual(junglegon, sillyPOCO.Name));
}

There’s our first NBehave specification. It’s pretty straightforward, and I particularly like how easy it is to read when the Given, When and Then clauses are accompanied by a well written scenario. You might ask whether or not this why of testing scales when testing complicated business functionality or frameworks, and I can say it does. Even better than just working, it forces you to improve the quality of your test code to make it more readable and less bulky which is what my workmates and myself experienced on our current project.

Anyhow, let’s take a look at testing with rhino mocks, we are going to add some pointless dependacy properties to out silly object to test the interactions using mocks.

[TestMethod]
public void AnNBehaveSpecWithMocking()
{
SillyPOCO sillyPOCO = null;

Story.WithScenario("a plain old nbehave spec")
.Given("an object we are going to test",
() => sillyPOCO = new SillyPOCO())
.And("the object has a silly service",
()=> sillyPOCO.SillyService = CreateDependency<ISillyService>())
.When("we call a method on the object",
()=> sillyPOCO.TalkToService())
.Then("the service should have been called",
()=> sillyPOCO.SillyService.AssertWasCalled(service => service.Chatter()));
}

NBehave provides a CreateDependency method as a wrapper for creating a mocks. When making your expects and asserts, you can use the rhino mocks extension methods as a simple of way checking things happened the way you expected.

You can find the code for the examples at the bitbucket repo:

http://bitbucket.org/naeem.khedarun/projectpit/overview/

The samples for this part are under a tag called partone. Simply get the repository and update to that tag.

Friday, November 27, 2009

New balloon tip notifications for PDC Downloader

image

There are balloon tips for starting and finishing downloads. There is also one if the download errors for whatever reason, in which case mail me the log file!

download

New version of PDC Downloader

Incremental improvements this time based on requests.

  • Now logs all exceptions to a log file in Logs/<date-time>.log. If you have any problems just email this log to me and I’ll take a look and push out a new version with fixes.
  • Removes failed downloads from the download queue so you can try and re-download.

download

Wednesday, November 25, 2009

PDC Session Downloader Resuming is now fixed…

download

I hope so anyway…

PDC Session Downloader resume functionality

Seems to be broken… I’ll try and have it fixed by tomorrow.

Update to PDC Session Downloader

Based on some requests I’ve updated the application.

Changes:

  • Updated application to work with full sessions list so you can download all available sessions
  • Added ability to resume broken downloads.
  • Added ability to download sessions with strange characters in the description.

The repository has been updated with the changes, and a new download link.

download

Enjoy!

Doh! PDC Downloader

It looks like frank has updated his XML file (which my application uses) with some new sessions. Luckily the XML structure is abstracted away using a stylesheet tranform. I’ll update the application with the new file this evening.

PDC 2009 Session Downloader

So PDC 2009 is all wrapped up and for those of us not lucky enough to attend, we still have the sessions which are available on the PDC site http://microsoftpdc.com/.

This would have normally been enough for me, however Frank (http://www.franksworld.com/) was nice enough to provide a small utility to automatically download the sessions. The utility does work, but it did leave something to be desired (A non blocking UI, ability to choose sessions, etc…) so my OCD kicked in and I just had to do something.

I’ve built a little application which let’s you choose which sessions you want to download, and provide a way to see each downloads progress.

image

image

It wasn’t bad for a few hours work, however there’s some nice technology backing it and it’s a fun little solution to try new things inside.

You can find the full source code on bitbucket: http://bitbucket.org/naeem.khedarun/fancypcddownloader2009/overview/

It’s built using Visual Studio 2010 (Beta 2), and you’ll find inside some examples of using:

  • Parallel task library
  • WPF
  • NBehave (BDD) Specifications
  • Caliburn / Prism
  • Windsor IoC with Fluent Configuration
  • Xslt Transforms / DataContract serialising

There’s a few more things I plan to add, but so far I’ve got it downloading my sessions and that’s keeping me happy for now. If you do make any modifications feel to fork it on bitbucket and I’ll merge the changes in.

* Update new version*

download

Wednesday, November 11, 2009

Building a package management framework

One of the open source projects I’m currently working on is PiXI which you can learn more about here.

The project is essentially a framework which allows plug-ins to be added using MEF and MAF loaded out of a few plug-in directories. So writing a new plug-in for the framework is incredibly easy (I think…), however pushing plug-ins to users is still a real pain.

The current process would be:

  1. Create a WiX installer for your plug-in which deploys everything into the appropriate directories.
  2. Upload the plug-in somewhere.
  3. User downloads the plug-in from somewhere
  4. User installs it via the installer (which normally contains prompts and isn’t a background operation).

This is less than idea, in both distribution and developer effort, so moving to a new model is a good idea. And since MEF is really kicking off now a framework to more easily facilitate this process wouldn’t go amiss.

I would like this to follow a more unix like approach using the idea of packages. This is all available in Linux on more recently on smart phones however windows is greatly lagging behind in this respect. My current thinking for this process is split into three main areas:

image

The NPackageManager suite is a combination of tools, API’s and applications to allow for some flexibility in this process.

  • BUILD – This is aimed towards plug-in developers who need an easy means of packaging and deploying plug-ins. Currently NPackageManager contains a command line tool to package up a solution together with a package definition, similar to many Linux repo systems.
  • INSTALL – This is targeted towards the target application which needs to consume the plug-ins. Target applications need an easy way to setup the ability to consume generated packages and register associations in the registry. For all intents and purposed discovery of new plug-ins is left to the actual technology employed, for example MEF will take care of the integration aspect.
  • UNINSTALL – Again targeted towards the target application, a simple API to uninstall from a list of installed plug-ins should be provided (not there yet). This means an application can expose the functionality to the user without having to hand crank the un-installation code which should normally be similar between projects.

I’ve made a start on this (basically enough to move my own project forward) and will be blogging about improvements to this as time goes on.

http://bitbucket.org/naeem.khedarun/npackagemanager/

Using the configuration section designer

There’s an awesome tool which one of my work mates showed me called the Configuration Section Designer. It’s an open source project and be found on Codeplex here.

It really beats hand cranking a custom configuration and generates a nice API for using your new configuration section.

After installing it, it’s simple to add a new configuration.

image

This will split out a bunch of generated files, in my case:

image

The one we are interested in is the .csd file, which is where we go to edit the configuration section using the designer. So let’s open that one up, and we get a nice designer with some logical toolbox items:

image

I’ve created my custom configuration section with a single attribute called installationRoot:

image

When you try and save, the CSD attempts to validate your configuration section, and errors will appear in the usual visual studio error box:

image

It will want you to give the namespaces for where you want the generated files to go, in my case I used their physical location in the solution so everything matches. You can edit namespaces and xml namespaces as well as types for the attributes and everything else in the properties box.

image

It’s all quite logical and straightforward to use. It really comes in handy when you start putting together complex configuration sections and realise you have no code to write:

image

Consuming the generated API is also very straightforward:

[Test]
public void Create_WithValidConfiguration_HydratesStructureConfigurationObject()
{
Structure structure = NPkgConfiguration.Instance.structure;

Assert.AreEqual("package", structure.packageRoot, "Failed to hydrate correctly.");
Assert.AreEqual("installation", structure.installationRoot, "Failed to hydrate correctly.");
Assert.AreEqual("source", structure.sourceRoot, "Failed to hydrate correctly.");
Assert.AreEqual("document", structure.documentRoot, "Failed to hydrate correctly.");
}

Hope you enjoy using it!

Thursday, October 1, 2009

Using Mercurial with TFS – Read Only files

After having used mercurial on a project, going back to TFS was slightly depressing. However I did stumble upon this post which shows how you can use mercurial to fill in some of the TFS gaps around working offline.

If you working on a particularly large piece and don’t want to go through the pain of a TFS branch, being able to commit to a local repository frequently and take advantage of mercurials merge algorithms when committing to older revisions is incredibly useful – anyway I digress.

The post outlined above seems to have omitted the way TFS tracks changes against files using the read-only file system flag. So when you attempt to update you ‘tracking’ workspace with a bunch of new changes mercurial will be unable to update the read-only files.

If you attempt to make all the project files writable, TFS will pick up changes against files even when they have no differences with the workspace version.

Luckily there is a handy mercurial extension called MakeWritableExtension which will make read-only files writable if it tries to make changes to them.

http://mercurial.selenic.com/wiki/MakewritableExtension

If like me your using TortoiseHg, either update the Mercurial.ini in the TortoiseHg folder or in your local user folder. I added the following lines to C:\Program Files\TortoiseHg\Mercurial.ini

[extensions]
makewritable = C:/makewritable.py

And then copied the python file in the link above in my C drive (because I’m lazy). Whenever mercurial tries to update a read-only file you will get:

image 

Now it will automatically set the edited files to writable thus doing a TFS checkout and making life a *lot* easier.

Thursday, September 24, 2009

An invalid or incomplete configuration was used while creating a SessionFactory

If like me your also getting this error when using the lastest FluentNHibernate binaries you might want to try building the lastest code from source.

http://code.google.com/p/fluent-nhibernate/source/checkout

Using the lastest cut of the code has resolved this issue for me…

Tuesday, September 8, 2009

Clearing Visual Studio Memory Consumption With A Macro

Recently one of my work mates sent an email round the development community saying that:

If your visual studio is taking up too much memory then you can run an empty visual studio macro to reduce its foot print.

Some evidence was provided via task manager which showed VS taking over 1gb of memory before the macro was run, and only a few megabytes afterwards.

You may call me a sceptic but I immediately called foul, thinking it was impossible. I decided to try it myself just to see if it was a complete lie.

Before

before

After

after

Wow, devenv.exe has had its private memory (which is the value reported by Task Manager) reduced from 1.3gb to a mere 26mb. So my workmate wasn’t completely wrong. But taking a look at some of the other values shows the results are less promising. So I wanted to know what exactly each of those memory columns mean. Stack Overflow had an answer, the below is copied from here:

Working set:

Working set is the subset of virtual pages that are resident in physical memory only; this will be a partial amount of pages from that process.

Private working set:

The private working set is the amount of memory used by a process that cannot be shared among other processes

Commit size:

Amount of virtual memory that is reserved for use by a process.

And at microsoft.com you can find more details about other memory types.

So it looks like the working set and private set have been cleared down, but all of VSs process data is still in the virtual memory. So its my understanding that you are probably making VS slower since when VS needs some of that data, there is a higher chance of it hitting the pagefile. If your low on memory and need to use other applications then this would have been a good idea had it not been for the fact windows will probably automatically do this for you anyway.

Is this a myth busted or have I misunderstood something?

Wednesday, May 27, 2009

An exception was thrown while exploring tests. Gallio.

I was getting the below exception constantly while trying to run some unit tests in our solution.
[error] An exception was thrown while exploring tests.
Location: C:\x\Solutions\x.Web.Controllers\bin\Debug\x.Web.Controllers.DLL
Reference: x.Web.Controllers, Version=1.0.0.0, Culture=neutral, PublicKeyToken=null
Details: System.Reflection.ReflectionTypeLoadException: Unable to load one or more of the requested types. Retrieve the LoaderExceptions property for more information.
at System.Reflection.Module._GetTypesInternal(StackCrawlMark& stackMark)
at System.Reflection.Assembly.GetTypes()
at Gallio.Reflection.Impl.NativeAssemblyWrapper.GetTypes() in c:\RelEng\Projects\MbUnit v3\Work\src\Gallio\Gallio\Reflection\Impl\NativeAssemblyWrapper.cs:line 72
at Gallio.Framework.Pattern.TestAssemblyPatternAttribute.PopulateChildrenImmediately(PatternEvaluationScope assemblyScope, IAssemblyInfo assembly) in c:\RelEng\Projects\MbUnit v3\Work\src\Gallio\Gallio\Framework\Pattern\TestAssemblyPatternAttribute.cs:line 122
at Gallio.Framework.Pattern.TestAssemblyPatternAttribute.Consume(PatternEvaluationScope containingScope, ICodeElementInfo codeElement, Boolean skipChildren) in c:\RelEng\Projects\MbUnit v3\Work\src\Gallio\Gallio\Framework\Pattern\TestAssemblyPatternAttribute.cs:line 70
at Gallio.Framework.Pattern.PatternEvaluator.Consume(PatternEvaluationScope containingScope, ICodeElementInfo codeElement, Boolean skipChildren, IPattern defaultPrimaryPattern) in c:\RelEng\Projects\MbUnit v3\Work\src\Gallio\Gallio\Framework\Pattern\PatternEvaluator.cs:line 196

Our tests rely on the gallio unit testing framework, which is pretty cool but thats for another post. This exception was driving me mad, until I noticed our solution had a bunch of referenced assemblies with CopyLocal set to False. This is great for build performance, but gallio didn't seem to like it.

Since referenced assemblies don't usually change much its nice to have copy local set to false, I didn't plan on changing this for gallio.

Writing a script to one-off copy the referenced assemblies into the unit test projects is the solution in this regard. Just a heads up incase you get caught in this trap.

Edit: Here a nice post about the subjects from one of my workmates. [+]

Monday, May 25, 2009

Pretty printing code in Blogger

If like me you need to paste in chunks of code into your blog, then it's nice to have it looking similar to how it looks in your code editor. Theres a project called SyntaxHighlighter which does just that. It's a bunch of css, javascript and image files which apply the code formatting on the clientside. Previously on my self hosted wordpress blog it was quite easy to upload the required files and change the site template. Unfortunately this isn't possible with a hosted account, however luckily its still easy enough to get this working in Blogger.

This trick involves linking directly to the javascript files on the projects webpage. The idea came from urenjoy, which at first I was thoroughly reluctant to do, which was linking to the files in the google code trunk. However that was for v1.5, with version 2.x we are a little luckier:

we_have_permission_from_the_author_for_direct_linking

A big thumbs up to alex for allowing us to do this!

Instructions:

  1. Go to the Layout tab, and select Edit HTML.
  2. Paste the contents of shCore.css and shThemeDefault.css straight into the skin section of the template.
  3. Add the script code shCore.js shBrushPlain.js and the brushes you will want into the head section.
  4. Add the necessary syntax highlighter configuration javascript into the body section.

Here's a rough example of how it should look:

<head>
<b:include data='blog' name='all-head-content' />
<title><data:blog.pageTitle/></title>

<b:skin><![CDATA[

    /*  Theres probably a bunch of code for your theme here, leave it as-is */

    [paste the contents of http://alexgorbatchev.com/pub/sh/2.0.320/styles/shCore.css here]
    [paste the contents of http://alexgorbatchev.com/pub/sh/2.0.320/styles/shThemeDefault.css here]

]]></b:skin>

    <script src='http://alexgorbatchev.com/pub/sh/2.0.278/scripts/shCore.js' type='text/javascript'/>
    <script src='http://alexgorbatchev.com/pub/sh/2.0.278/scripts/shBrushPlain.js' type='text/javascript'/>
    <script src='http://alexgorbatchev.com/pub/sh/2.0.278/scripts/shBrushXml.js' type='text/javascript'/>
    <script src='http://alexgorbatchev.com/pub/sh/2.0.278/scripts/shBrushCss.js' type='text/javascript'/>
    <script src='http://alexgorbatchev.com/pub/sh/2.0.278/scripts/shBrushJScript.js' type='text/javascript'/>
    <script src='http://alexgorbatchev.com/pub/sh/2.0.278/scripts/shBrushCSharp.js' type='text/javascript'/>
    /* You can add more brushes from http://alexgorbatchev.com/pub/sh/2.0.320/scripts/ */

</head>

<body>
    /* You can paste the below right after the body tag. */
    <script language='javascript'>
            SyntaxHighlighter.config.clipboardSwf = &#39;http://alexgorbatchev.com/pub/sh/2.0.278/scripts/clipboard.swf&#39;
            SyntaxHighlighter.config.bloggerMode = true;
            SyntaxHighlighter.config.gutter = false;
            SyntaxHighlighter.all();
    </script>
</body>

You will need to avoid messing with your blog theme within the template. I would recommend copying the template into an editor, adding the changes, then copying it all back to save. I hope that makes things easier for you.

Oh and as mentioned in the below posts, you will need to HTML encode the code you wish to embed or any angle brackets will screw up the site template etc...!

To actually prettify some code you will need to wrap it in pre tags whilst specifying which brush (code style) to use. You can get a full list of brushes here.

<pre class="brush:xml">
... code here
</pre>

Here a couple of links which aided me in my quest, although I wrote this post to bring the information up to date with SyntaxHighlighter 2.0 and hopefully slightly easier to follow. Good luck.

http://developertips.blogspot.com/2007/08/syntaxhighlighter-on-blogger.html http://urenjoy.blogspot.com/2008/10/publish-source-code-in-blogger.html

Trying out SyntaxHighlighter with blogger

The primary requirement for my blogging platform is to be able to display pretty printed code. So here goes:

public static void RegisterRoutes(RouteCollection routes) {
          routes.IgnoreRoute("{resource}.axd/{*pathInfo}");

          routes.MapRoute(
              "Default", // Route name
              "{controller}/{action}", // URL with parameters
              new {controller = "Home", action = "Index"} // Parameter defaults
              );
      }

Sunday, May 24, 2009

Trying out blogger

I've been using a self hosted wordpress blog for a little while now, and whilst I find wordpress a fantastic piece of software looking after a VPS is somewhat of a pain point. I did try to move over to a hosted wordpress account, but unfortunately there were some niggles with that which forced me to delete the account and keep hosting it myself.

  • Cannot install plugins (only works with self hosted installations).
  • Cannot edit site templates / css without paying for an 'upgrade'.
  • I didn't notice any easy domain forwarding built into wordpress like there is with blogger.

I was using a windows tool called Zoundry Raven (now open sourced!) with wordpress, but it also works with blogger out of the box, if all goes well I'll migrate all the posts over... I highly recommend the Raven tool for easy writing and publishing...

Friday, February 27, 2009

Getting all entries in an Enum as a list

I needed some code to get each field in an enum as its enum type and not just its string name or value. Most example on the web seem to use reflection, or getting the name and converting that to an enum, I wanted a simpler way:

User[] allValues = (User[])Enum.GetValues(typeof (User));
List<User> allUserFields = new List<User>(allValues);

That was the easiest way I could find, and is good enough for now, but maybe someone else has a nicer way...?

Alternatively you can get the List directly using:

((User[])Enum.GetValues(typeof (User))).ToList()

However if you need todo any processing on the list I find the first way more readable.

Tuesday, February 24, 2009

Inspecting Messages with an IClientMessageInspector

I was building up a library which consumes a RESTful API, and needed some way of intercepting the incoming messages before serialisation so I could inject some custom logic. The API is facebooks one in particular which isn't really truly RESTful but that's another story.

Effectively some of the service methods can either return the expected return message if nothing has gone wrong, or an exception POX message if something has gone wrong. This could range from a mal-formed querystring exception to permissions or an incorrect method call. So I wanted some way to catch this and throw a proper .NET exception instead of WCF throwing a could not deserialise exception when it's unable to hydrate an object designed to match this message:

<?xml version="1.0" encoding="UTF-8"?>
<fql_query_response 
  xmlns="http//api.facebook.com/1.0/" 
  xmlnsxsi="http//www.w3.org/2001/XMLSchema-instance" 
  xsischemaLocation="http//api.facebook.com/1.0/ http//api.facebook.com/1.0/facebook.xsd"
  list="true">
  <user>
    <name>Mark Zuckerberg</name>
  </user>
  <user>
    <name>Chris Hughes</name>
  </user>
</fql_query_response>


with this message:

<?xml version="1.0" encoding="UTF-8"?>
<error_response
  xmlns="http://api.facebook.com/1.0/"
  xmlns:xsi ="http://www.w3.org/2001/XMLSchema-instance"
  xsi:schemaLocation ="http://api.facebook.com/1.0/ http://api.facebook.com/1.0/facebook.xsd">
  <error_code>5</error_code>
  <error_msg>Unauthorized source IP address (ip was 10.1.2.3)</error_msg>
</error_response>


So I really wanted to hook into the point at which WCF does the deserialising, catch the exception, and then rethrow my custom facebook exception. However I wasn't able to pull that off (lack of documentation) so for now I'm simply inspecting each message individually. This is not the best solution but will do until I figure out how to do it more gracefully and efficiently. It serves as an example for now.

The first thing we need to do is add a new behaviour to our Endpoint which will subsequently add our new message inspection logic.


var customServiceProxy = new ChannelFactory<ICustomService>("CustomService");
customServiceProxy.Endpoint.Behaviors.Add(new HookServiceBehaviour());


The next step is to add our new message inspector.


public class HookServiceBehaviour  IEndpointBehavior     
{         
    #region Implementation of IEndpointBehavior               
    
    public void Validate(ServiceEndpoint endpoint){}         
   
    public void AddBindingParameters(ServiceEndpoint endpoint, 
        BindingParameterCollection bindingParameters){}         
    
    public void ApplyDispatchBehavior(ServiceEndpoint endpoint, 
        EndpointDispatcher endpointDispatcher){}                  
    
    public void ApplyClientBehavior(ServiceEndpoint endpoint,                
        ClientRuntime clientRuntime)        
    {            
        clientRuntime.MessageInspectors.Add(new CustomMessageInspector());        
    }     
        
    #endregion  
}


And implement our custom message inspector:


public class CustomMessageInspector  IClientMessageInspector    
{         
    #region Implementation of IClientMessageInspector              
    public object BeforeSendRequest(ref Message request,             
        IClientChannel channel)         
    {             
        return request;         
    }              
    public void AfterReceiveReply(ref Message reply, object correlationState)        
    {            
        MessageBuffer messageBuffer = reply.CreateBufferedCopy(int.MaxValue);            
        Message message = messageBuffer.CreateMessage();                 
        XmlDictionaryReader contents = message.GetReaderAtBodyContents();                        
        
        //inspect contents and do what you want, throw a custom              
        //exception for example...                 
        //We need to recreate the reply to resume the deserialisation as it             
        //can only be read once.            
        reply = messageBuffer.CreateMessage();            
        messageBuffer.Close();        
    }             
    #endregion    
}


An actual implementation of this example can be found here: http://www.codeplex.com/fluentfacebook

Thursday, February 5, 2009

Dog slow WPF transparency

It's been awhile since my last post, I've been busy at work so had to take a break from my TeamCity exploits, and then I got side-tracked building a little utility for myself.

The application is built in WPF and is yet another .NET natural language command window, but with some neat tricks. It was however, performing absolutely terribly, and I thought I only had myself to blame. Initially I thought it was me patching into some unmanaged funtions for some of the jiggery-pokery, as outlined below.

zrclip-001p2b8c83ba.png

However, I was unable to work out why SOO much time was being taken in the GetMessageW and DispatchMessage funtions, it was a real mind-f**k. After exausting all possibilities, I tried some random attacks here and there, one of them was turning off the transparency on the main window, and low and behold, the application is now performing super-quick, but why? Some googling turn up this.

So unfortunately, if your on an unpatched Vista or XP, you will need to get one of the following patches...

Vista

XP

According to the thread it seems the hotfix is already in Vista SP1 and XP SP3. Glad I found this one before... doesn't bear thinking about; my fault for not updating to SP1.

Monday, January 26, 2009

Traversing Many-To-Many mappings with NHibernate Query Generator

We've been using the NHQG for awhile now, and we've had great success with it.

It wasn't until today that I found that the standard mapping using a Matches:

return Where.Interview.Attendees.Matches(Get.PersonSummary.ID, 
Where.PersonSummary.ID == RraPerson.GetCurrent().ID);


So I have a collection of PersonSummaries, which are mapped using a link table shown by the mapping below:

<idbag name="Attendees" table="InterviewAttendee">
  <collection-id type="Int32" column="ID">
    <generator class="native"/>
  </collection-id>
  <key column="InterviewID" />
  <many-to-many class="Namespace.PersonSummary, Assembly" column="PersonID"  lazy="false" />
</idbag>


Unfortunately this was not working and throwing an NHibby exception:

threw an exception of type 'NHibernate.QueryException'
base {NHibernate.HibernateException}: {"could not resolve property: Attendees of: Namespace.PersonSummary"

After some struggling I stumbled upon this blog post from Ayende which demonstrates how to perform a query against a many-to-many mapped collection. So my query now looked like:

return Where.Interview.Attendees.With().ID == RraPerson.GetCurrent().ID;


Sweet! The With() method works very nicely and even neatens up the query.

Wednesday, January 14, 2009

Awesome code formatter

I wasn't able to get to get some of my code looking neat within wordpress, but luckily stumbled upon this nice web based code formatter: http://www.manoli.net/csharpformat/.

It format's: C#, XML, SQL, VB and gives you the ability to specify line numbers and alternate line colourings - Cool :)

I've noticed is outputs the same layout as Ayende and a few other coders use on their blogs.

Eager loading from a formula in NHibernate

A little while ago, our project started looking at optimizing some of our code. Just for some background the application is a windows based smart client using NHibernate, WCF, WPF and a custom built framework tying them together.

One of the problems I faced was the disparity between our relational model and object model, and so leveraging our ORM we use formulas and mappings to bridge the gap between the database and our entities. The next problem was that we mapped the ID's of disconnected entities onto the entity in question using formulas, meaning we had to lazy load (over WCF) the sub-entities mapping using a formula. In some cases this is perfectly fine, in others it proved a bottleneck and we wanted to get everything loaded in one network call and database hit.

At the time of writing (coding?) NHibernate did not support mapping a formula to an object. We would expect something such as:

<property name="Entity" formula="dbo.Formula(ID)" class="Namespaces.Foo, SampleAssembly" />

Unfortunately this doesn't work, so I had to create a custom user type for it. If you don't know about NHibernate UserTypes I suggest you read: Ayende: UserTypes.

So now the XML to eager load our entity looks as below :-

<property name="Call" formula="dbo.PersonCurrentCall(ID)">
  <type name="Namespace.EagerLoadingUserType, Assembly">
    <param name="entitytype">
      Entities.TypeOfEntityToEagerLoadFromID, Assembly
    </param>
  </type>
</property>

The code for the user type is below however the magic is really in the IParameterizedType interface. This effectively allows you to give your UserType arguments (in my case the fully qualified class name of the entity we wish to eager load. SetParameterValues is called when NHibernate is first loaded and reads the mapping data.

The NullSafeGet method contains some of our domain specific code which you will need to replace with your own. When NHibernate loads up the root entity (which our "TypeOfEntityToEagerLoadFromID" hangs off) it will attempt to populate the entities members, and will hit our NullSafeGet method with the ID for this member. This is the point which you will want to use your server-side container or framework to load this new entity from your datasource (probably using NHibernate) and return the object for NHibernate to insert into the root entity.

/// <summary>
/// Eager loads entities which are mapped using a SQL formula.
/// </summary>
public class EagerLoadingUserType  IUserType, IParameterizedType
{
    private Type _type;
    
    #region IParameterizedType Members
    
    /// <summary>
    /// Sets the parameter values. In this case the type of entity 
    /// we are eager loading.
    /// </summary>
    /// <param name="parameters">The parameters.</param>
    public void SetParameterValues(IDictionary parameters)
    {
        _type = Type.GetType((string)parameters["entitytype"]);
    }

    #endregion

    #region IUserType Members
    
    /// <summary>
    /// Gets the type and ID of the object load eager load from the 
    /// database.
    /// </summary>
    /// <param name="rs">The rs.</param>
    /// <param name="names">The names.</param>
    /// <param name="owner">The owner.</param>
    /// <returns></returns>
    public object NullSafeGet(IDataReader rs, string[] names, object owner)
    {
        object r = rs[names[0]];
        int? entityID = (int?) r;
        if(entityID.HasValue && _type.IsAssignableFrom(typeof(EntityBase)))
        {
            return FrameworkHelper.LoadEntity(_type, entityID);
        }

        return null;
    }

    #endregion
}

A large amount of this class has been omitted since it implements the interface based on the defaults outlined in Ayende's article.

I hope you have found this post useful, I've tried to explain as best I can and I may put together some working sample code in the future. This may also not be the best approach but it was the only one I could see that worked.

Alternative to Launchy

A while back I spotted a friend of mine using a launchy style application which made me go "Hey whats that?". He pointed me in the direction of enso. Much like launchy it's a capable quick application launcher, with quite a clean interface.

One thing I noticed is that it's noticably faster and more responsive in comparison to Launchy.

I would recommend to get the additional add-on packs:

These are the two main facilities that I use, however some of the other beta products may be useful for other people. Once installed you drive the application using the otherwise useless Caps-Lock button (which I haven't use in years).

zrclip-002p501bb3a2.png

Hitting Caps-Lock open (which auto-completes if you hit o) and then let go of Caps-Lock, an enso style launcher opens, with similar features to Launchy. However whats different to other application launchers is that you can perform a number of other commands with don't involve launching.

For example I can minimise the current window by hitting Caps-Lock and typing min which auto-completes to minimise:

zrclip-003n1b2cede5.png

The interface is transparent and is shown in the top-left of the screen which is nicely out of the way and looks pretty neat. You can grab text by selecting some text from an application and depending on the command enso will pull the selection and paste it as an argument to the relevant commands, such as the google or google-map commands. So you can select an address by highlighting it, run the google-map command, and it will do a search on the highlighted text, great :)

Given the amount of people in my work-place who now go "Oooh, whats that?" when they see me using enso, I figured I'd share it here. Unfortunately, as some of the plugins are beta, and the product is new there are some issues:

  • If you have some text highlighted, and run an enso command, it will pick it up. So if you didn't mean for this to happen and have an entire files contents selected, enso will take a fair while copying and pasting it as an argument (sometimes causes enso to crash).
  • There are some features which have not been implemented, for example it will only list 10 suggestions if you type something fairly generic and does not allow you to scroll and view more.
  • Clicking outside of the launcher box does not exit the launcher, you need to manually hit esc.

I would still recommend people give this application a go as I have found it very useful!

Monday, January 12, 2009

Configuring teamcity to build an msbuild solution

The next step for my team city build server was to get it building my project whenever changes have been checked in.

  1. Select your project.
  2. Select your build configuration (which I made here).
  3. Hit the "Edit Configuration Settings" button.
  4. Select build triggering.
  5. Check "Enable triggering when files are checked into VCS.

I then configured my Build Runner to build the correct solution file with MSBuild. My project structure is:

WhereAreYou\Solution

And my solution file is WhereAreYou.sln, so I configured to runner as shown below:

zrclip-002nc23bfc8.png

Pretty straightforward, and low and behold my build passed:

zrclip-003p5f6ad499.png

Next is to get my Continuous Build running Unit Tests...

Sunday, January 11, 2009

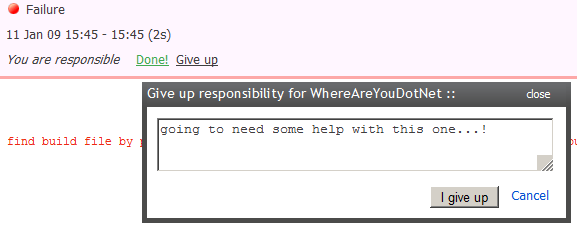
I can finally give up...

...fixing the build!

zrclip-002n71b233e4.png

LOL that really made me chuckle. I can see teams suffering from a fair bit of broken build delegation with this feature :-)

I like the addition none the less.

A look at TeamCity for Continuous Integration and Build Management

We currently use Cruise Control for our continuous integration and build management at work, and it works for us quite nicely. For the current project we have a few different builds and deployments for building, integration tests, reporting and migration.

We are using a slightly older version of cruise control so the web interface is lackluster, the cc-tray is reasonably low on features (although functional) and we've had some integration issues with TFS (which are normally able to get around). The newer version looks very nice and an improvement on the version we are currently using, however I wanted to try something altogether different, which brings me to TeamCity from JetBrains.

On paper it looks fantastic, with some highlights (as far as .NET is concerned):

  • Integration into visual studio.
  • Plugins for FxCop, NAnt and Windows tray.
  • Gated checkins (Don't need to wait for the new TFS).
  • A built in duplicates finder.
  • Distributed computing for faster builds!

So overall it really looks like a great tool which could rival CC.NET, and for Java TeamCity could well be a heavenly system for IntelliJ zealots!

zrclip-001ne227ba.png

Actual installation was a breeze (A bunch of nexts), TeamCity will actually deploy a Tomcat server (Only supplies a web interface) and you have the option to run it as a windows service (I picked yes). It does look like the application is slightly heavy on resources:

zrclip-002n69e3a768.png

The extra java.exe process is for the one build agent I have configured already, we'll get onto this in a bit. Given the functionality it offers we can forgive it's footprint, but I recall CC being slightly easier on resources especially when idle.

Let's take a look at the web interface where all the configuration and administration happens:

zrclip-003n30d5d8b5.png

Here's a project I've setup earlier, this is the first thing TeamCity will want you todo, setting up a project involves just giving it a name, however you will need to then create a build configuration.

A build configuration consists of:

  • General Settings (Build numbers, build fail conditions and hanging build detection (which is nice).
  • Version Control settings, of which it supports them all (except git).
  • Build Runner, I'll take a look at configuring this in the next post, first with MSBuild and then for NAnt when I get onto more complicated deployments.
  • Build triggering, such as trigger a build when someone checks in, but there are some other options.

The fail building scenario options are straightforward:

zrclip-005n2fd2a5f4.png

As I mentioned before, TeamCity will want some agents to be able to run the builds on. In my case I put an agent on the same machine as the TeamCity web server, however this is not necessary. Installing buld agents simply requires you to go to the Agents page, download the appropriate file for your O/S (MS Installer, Java Installer or a ZIP) and follow the instructions. I will attempt to add my quad core machine as a build agent and see how it all works in a future post.

zrclip-006p22670301.png

That was a really sketchy first look at TeamCity after getting it installed, future posts will hopefully be more useful :)

A great desktop blogging application

Clearly I'm new to this, but after some googling, and a lovely post comparing some desktop blogging applications I've arrived at w.blogger

Wordpress Desktop Blogging: 5 Tools Reviewed | CenterNetworks

Some of the features I like:

  • Ability to upload images directly to the wordpress media library and link to them.
  • Can either just post, or post and publish directly from the client.

It seems at the time of writing Zoundry did not perform to well compared to the competition, but after trying w.blogger, BlogJet (which doesn't seem to work on Windows Server 2008) and Zoundry Raven (Successor to the original Zoundry in the review) I've really shown a liking towards the latter.

zrclip-001p6f2dd680.png

Inserting images is a breeze (just paste them in), the WYSIWYG editor works great (feels similar to using outlook) and the interface is clean and simple. One annoyance is that it doesn't seem to have built in spell checking... but I'm willing to let that slide.

The HTML viewer is formatted nicely and syntax colouring is good and there is tag completion. Overall an impressive product which is donationware, head over to the website for a full list of features and download:

http://www.zoundryraven.com/

Saturday, January 10, 2009

A quick look at Mozilla Flock for blogging

Personally I hate doing any kind of serious work within a web form, the as good as Wordpress's WYSIWYG editor is, I find the user experience within a web form irritating.

So to try and get around this possibly illogical attitude, I'm giving the new mozilla 'browser' a go, which is called Flock. So far it's relatively interesting and seems to be firefox with some extravagent plugins to interface which a bunch of popular web services.

The current one of interest to me is the ability to use flocks own editor to publish directly to a multitude of blogging engines (even user hosted ones) which I do like the idea of.

Edit - Unfortunately, whilst Flock is able to upload pictures automatically to Flickr, it cannot upload to wordpress's media library, nor allow you to specify a custom ftp server for your blogs images - Nevermind :-(

Maybe when the product matures and such functionality is available it will be a more powerful platform for blogging, what I say so far was quite nice:

2009-01-10_183444.png

The configuration is painless as you only need t specify your blogs URL, username and password, and your good to go.

Givens Flocks a mozilla product, it might be worth attempting a plugin at some point to add custom uploading support. If you use Flickr, Facebook or some of the other gallery platforms Flock may well be for you!

Too lazy to use phpMyAdmin to back up a database on a remote server?

Heres a nice little command to backup all your database into a SQL file:

mysqldump -uusername -ppassword --all-databases --opt >/location/backup.sql

Together with a bit of cron and it should be nice a backup solution onto a remote server.

Part of the reason for this is that my MySql server is not accessible remotely and my VPS is accessible by SSH only.

Basis for this taken from, although the command posted there was missing the --all-databases flag:
http://www.pantz.org/software/mysql/mysqlcommands.html

Installing VMWare Server 2.0 on Ubuntu "Hardy Heron" woes

You may get a complaint to the effect of:

Your kernel was built with "gcc" version "4.2.3", while you are trying to use "/usr/bin/gcc" version "4.2.4".

But no worries, if you continue and force [yes] it should install fine and work normally.

However, my vmware refused to start with:

vmware is installed, but it has not been (correctly) configured for this system. To (re-)configure it, invoke the following command: /usr/bin/vmware-config.pl.

In order to get around the problem I attacked it randomly by:

sudo apt-get update

sudo apt-get update
sudo apt-get upgrade
sudo apt-get install build-essentials
sudo apt-get install linux-headers-`uname -r`

And re-ran:

sudo vmware-config.pl

Say [yes] to compiling with the incorrect version and hopefully your's will then work as mine did...

A really inspirational project

Personally I have never been strong at communication, and as a demographic programmers probably share this as a failing.

Recently I was rolled of a project which I was part of for a year, where I learned just how important communication and knowledge sharing is between peers, a big enough lesson for me to attempt to maintain a blog (three previous failed attempts).

Our medium for knowledge sharing was rather retro: emails. But we've learned is that what works - works. Theres no point trying to setup a forum or Wiki if no-one has the patience to use it, with real importance given to activity and participation. The atmosphere and attitude in the email threads we're motivating, inspiring and copious amounts of fun :-)

There's a satisfaction in sharing knowledge, helping others, and hopefully for having a platform to receive feedback from others, so:

My reasons for this blog?

  • Personal dumping ground of information I would like to archive.
  • Keep my peers better updated in what I'm doing.
  • Give Google a chance to index some potential useful information for other coders.
  • Satisfaction in contributing to the blogging community.

It is true that I could maintain a personal Wiki to dump my own useful information and use emails to keep peers updated, but I'm far too lazy (I'm sure you understand) to have to deal with more than one medium.

Why did I write this post? Mainly so I know why I'm maintaining this blog...